Monday, 18 June 2012

The Third Choice Trailer

Well, I did promise my next post to be on the short film 'FIVE' but thought this might be of interest while I am still writing up my next post!

It is a short teaser trailer for a short film called THE THIRD CHOICE I shot back in March/May on RED ONE and DSLR for the night exterior work. Although the tailer hasn't been colour graded I think it is looking pretty good. Hope you enjoy!


If you want to see more of my work, including that which has been colour graded, please check out my website www.djmears.co..uk

Thursday, 19 April 2012

Introduction to Cinematography: Part 2

Welcome to the second part of my introduction to cinematography blog posts. In this post I will discuss the basic lighting aspects of cinematography, and in particular how we will go about lighting our scene from part one.

First off, let's talk about why we light for film. The first reason we light is so we can get 'exposure' so the camera can see what is in front of it. This said, film lighting goes much further than this. The use of lighting can evoke a mood or a feeling to the audience and therefore help enhance the story telling. It can help focus the audience's attention on one particular part of the frame or another. Film lighting goes much further than illumination, let's discuss how this is achieved and how we go about lighting a scene.

When approaching lighting a scene for film the best place to start is to determine what light is available to you, and what light you are going to have to live with. For example, say you are filming outside on a bright sunny day there isn't much you can do with the sun and therefore you have to live with it. Now if you were filming in a room with a window and wanted to make it look like night, then all you need to do is black out the window and you get rid of the sunlight, providing a blank canvas to light the scene. Working this out before you come up with your lighting strategy is key and it could make or break your lighting scheme.

Ok, before we go any further in lighting our scene from part one let's look at different sorts of light and the way the direction of light can influence an audience's perception.

Light generally falls into two categories, hard light and soft light (as can be seen in the images below with Berty and Betty). This is determined by the quality of shadows they produce, hard lights producing harsh, sharp shadows and soft lights producing more graduated shadows. As you can see in the images below, the hard light shadow has a very definite starting point whereas the soft light shadow blends from light to dark.


The difference in shadows is caused by soft lights producing a more scattered light, generally caused by the light being diffused. This said, a hard light can be turned to a soft light with the use of diffusion or bounce material, think of the sun on an overcast day. The sun is a hard light source but when we get cloud cover it becomes diffused and scattered, providing a soft light source. Using a combination of hard and soft lights to light a scene can provide texture and interest to the image.

Now we have covered the two types of light, let's consider their placement and use. Deciding where to place a light might seem quite straight forward, but the effect this has on the final image is as big as where to place the camera and what lens to use! Lets have a look at the images below with Berty. Each image shows Berty with a single hard light source being move around from in front of him to behind at 45 degree increments.


With the light right in front of him, there is no doubting it is Berty. The image looks very flat with little texture.


With the light at 4:30 we have a little more texture in the image, as Berty's right side is darker than his left. And in addition we can now see his shadow on the table, frame left.


So now with the light to his left side he is half in shadow and half in light. The frame looks a little moodier now, a little more interesting and intrigue into who Berty is and where he is.


Now with the light to his back left side he is separated from the background but it is a bit more difficult to tell who he is. It makes him look a little more mysterious.


Now with the light directly behind him you can only see his face from the light reflected from the table. He is well separated from the black background but it is very difficult to see his face.

Using a combination of lights in these different positions will help create your lighting scheme.

So we have looked at hard and soft light, and in addition we have seen how the position of the light effects how the frame looks and how Berty comes across. Based on this, how do we light our scene from part one? Let's start by looking at the script again...


So from the top we can see that our scene is set at night and is an interior location. Based on this we know we need to remove any daylight at our location if we are shooting during the day.

We also know that FRANK peers into the darkness. This implies the room is quite dark when looking at it towards the door, therefore we may need to flag off any spill light in the room from around the door to help achieve this effect.

Flagging light means to stop light hitting a particular surface area or person in the frame. Light that usually needs flagging is called spill light.

The script goes on to say that FRANK is silhouetted by the light of the door, so we know there needs to be some light coming through the door to achieve this.

Then finally JACK leans forward into the light, this tells us there needs to be a pool of light in front of him but not where he is sat when FRANK comes into the room and sits down. Again we may need to 'flag' this light to ensure it doesn't spill into the area he is sat before he leans forward. This said we still need to see JACK a little to know there is somebody there, so placing a light at 12:00 o'clock or 1:30 would help us achieve this.

Based on this read through of the script the lighting scheme is as the image below.


As can be seen, FRANK is backlit from the door providing us with the silhouetting we need and in addition, when FRANK walks into the room he won't get lost in the darkness, we will still be able to see his outline. Looking at the right of the image we see that JACK is lit by a small light at 1:30 to provide a 'rim' light so we can see somebody is there when FRANK sits down and the camera dollies around. And finally we have the light in between the two men to provide the light for JACK to lean forward into and to backlight (from the camera's point of view) FRANK when he is sat down so we can still see a little bit of him.

Once you have a rough idea of where to place your lights a decision on the lamps and brightness of the bulbs needs to be made. With a limited budget and little equipment these decisions may be made for you, yet it doesn't stop you from tweaking the brightness and quality of the light using some simple tools such as bouncing the light of the ceiling or using some black material to flag a light off a wall.

Getting the light in the right position and choosing the quality of light (hard or soft light) is as important as the relative brightness of the lights in question. For example, getting the contrast between the light in the hallway and the light in front of FRANK could make or break the illusion that the room is dark. If the light in the hallway is too dark the room would look bright in comparison and vice versa. Again, getting the contrast between the light JACK leans into balanced to the 1:30 rim light hitting him when he is sat back is important too. Spending time tweaking the exposure of the camera and angle/brightness of the light will help achieve this contrast between the lights. This said, it is as important to budget time to tweak the lights once they are set-up as it is to light at all. This said, with experience comes an ability to second guess the lights required and any flagging or diffusion necessary to get the look you want, therefore reducing not only the time to light but also the tweaking time required too.

Obviously, the complexities of lighting for film go much further than this blog post and is something which I know many Directors of Photography say they learn more about with every shoot and every new challenge. I hope from this post you will take away that lighting for film can be used for more than just illumination, it is a tool available to the cinematographer to help tell the director's story.

I would like to close by thanking Ollie Craig for pulling together all the slide for the workshop (and as can be seen above!) and also running the lighting part of the workshop too!

In the next post I will talk about how I shot and lit a short film called 'FIVE' directed by Nathan Cook featuring Nikki Patel (Amber Kalirai) of Coronation Street fame.


If you want to see how I make use of light in my films check out my website at www.djmears.co.uk

Friday, 16 March 2012

Introduction to Cinematography: Part 1

I have been running workshops for the University of Sheffield's Filmmaking Society for the last three years, covering everything from basic camera operation to set etiquette and general filmmaking techniques. For the latest round of workshops I really wanted to look at the basics of cinematography. I wanted to show how some careful camera and lighting decisions can make some fantastic looking images, even with a limited budget and with minimal crew. If this sounds of interest to you, read on…


I believe all good cinematography starts with the script, if your vision of the film as a cinematographer doesn't match the script then the film could look amazing but not tell the story very well!

So let's kick things off with the script;


Every time I read a script I am going to shoot, I break it down into what I consider the four most important parts;
-Action
This is what the characters in the script do, including movement and interaction, such as 'FRANK walks into the office'.
-Dialogue
This is fairly obvious, it is what the characters say, such as 'I'm glad you came.'
-Character
The bits of the script that give away the little bits of information about the characters' mannerisms and persona, such as 'bites his nails'.
-Mood
These are the bits of the script that set the scene, that give you an idea of how the character's surroundings should look, such as 'Office. Night' and 'peering into the darkness'.

I believe getting to grips with the script can really help you focus your thinking on a scene (and the film overall) and allows you to visualise what the camera does and doesn't need to see. From here you can start to think about the best use of your filming location and therefore 'block' the actors.

Blocking means to 'decide on the movement of actors in a location to tell the story through the film frame.'

Usually the actors' blocking is run through with the Director and Cinematographer to decide the best placement for the actors and the camera. It is important to know your script before you start blocking as there may be elements of the script that affect how you use your location. For example, our short script outlines that once FRANK walks in he is 'silhouetted by the light of the door'. Obviously, where you place the actors and camera will effect whether this is achievable or not.

We decided to block our actors as outlined below, allowing for FRANK to be silhouetted by the light of the door when he sits down and leaving enough room to get the camera in the right position to get the shot.


After the actors are blocked, and you have a rough idea where the camera is going to go, we need to make several camera and lighting decisions as a cinematographer to help tell the story.

Camera
Once the actors are blocked, and you have a rough idea of where the camera is going to go, I believe there are three key factors the effect where you exactly place the camera.

Shot selection
Shot selection refers to the frame size of the shots that cover the scene, i.e. how much we see on screen. To simply break down shot selection, we have three main frame sizes; wide shots, mid shots and closeup shots, as can be seen below. Each frame size refer to how much of the scene we can see on screen at one time. For example, in the close up below we can see the woman's face filling the screen. In the mid shot we can see she is by a car, and in the wide shot we can see that she is stood by a body on the floor. We can use these different frame sizes to help focus the audiences attention on a particular area of the scene at each moment in time through the film.


For most scenes within a film the story is told with a combination of different shot sizes, all based around these three fundamentals.

For our short script, what do we feel is important to show at each given moment in the film? For instance, how would we know the room is dark if we started on a close up of FRANK standing at the door. Would we be able to portray JACK's menacing manner if we had a wide shot of him for his dialogue, or would a mid shot or close up be more suitable? It is all very subjective, but these decisions always leads back to knowing the script well and being able to interpret the story.

For our scene we decided on the following shots; a mid shot to cover FRANK peering into the darkness, showing some of the room and the door. When FRANK sits down we decided on a close up showing him biting his nails, silhouetted by the door. And finally, to cover JACK's line we will use a dirty mid shot over FRANK's shoulder, which will help show the geography between JACK and FRANK and allow JACK to lean forward into the light, showing the darkness he has left.

Lens selection
Once you have an idea of what shots you want to use to cover a scene, lens selection can play a big part on where the camera is actually placed. Lens selection affects how much of the 'background' you can see in a given shot and is basically how 'zoomed in' the camera lens is. The images below show Berty the egg and his friend Betty. In each image we use an increasingly 'zoomed in' (longer) lens but keep Berty the same size in the frame by moving the camera back.

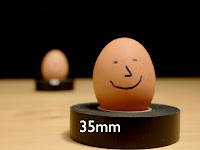


As you can see in the first image (with a wide lens) Betty looks quite far off in the distance, As the lens becomes more 'zoomed in' (longer) Betty becomes much bigger in the frame. This is due to the relative distance between Berty and Betty becoming less significant than the distance between Berty and the lens. For example, in the first shot on the 18mm lens the camera is within half a foot from Berty, where as Betty is about 1.5 feet from the camera. As we go to the 180mm lens Berty is around 4 foot from the camera and Betty about 5 feet from the camera.

Therefore, deciding on how 'zoomed in' the camera is, or how long a lens to use for a shot, can affect the composition of the frame, even if the main subject remains the same size in the frame. Given this, any length of lens can be used to achieve any of our three shot sizes discussed above.

The choice of lens for our short script will be discussed after camera movement.

Camera movement
As it says on the tin, camera movement refers to how the camera moves to cover the scene. There are basic movements available such as pan and tilt, which can easily be achieved with a tripod or even handheld. Then there are move advanced moves such as crab, track and crane that can be achieved with a range of different kit.

To read more about camera movement visit http://www.mediacollege.com/video/shots/movement.html

Camera movement can really help increase the production values of a film but shouldn't be used to cover up bad direction or blocking! All camera movements need to be motivated, this means that the camera should not move unless something in the frame does, otherwise the audience will become aware they are watching a film (not so good!). Camera movement can be motivated by an actor moving, a car driving past or a glance from one actor to another.

This said, a combination of good lens selection, camera movement and actor movement can help achieve different shot sizes without having to 'cut' independent shots together in the edit. This is particularly helpful when you want a scene to flow seamlessly. It can also really help increase the production value of a film.

For our script we have already decided on what shots we want to cover the scene and in addition we know the actor movement, which involves FRANK walking in and sitting down, and then JACK leaning forward. Let's start from the middle with the closeup of FRANK biting his nails. The first decision is do we use a long lens or wide lens for this shot? If we use a long lens the camera would have to be quite far away to see FRANK - have we got enough space to get that far back? Would we see enough background with that lens to see FRANK is silhouetted by the light of the door? If we used a wide lens we could be much closer to FRANK for him to fill the frame to the same amount but would we see too much of the room? One advantage of a wider lens would be that we could get the shot of FRANK at the door in the same shot by adding some simple camera movement, such as tilting. If we can get those two shots in the same take, can we get the shot of JACK from over FRANK's shoulder in the same take too? How would we need to move the camera to achieve this? Now, if we were to track around from the side of FRANK to behind him we would see JACK. Would this move be motivated? Yes, as FRANK is walking in and JACK is leaning forward, as long as the tracking movement is in time with the actors' movements it will appear seamless.

Now we have decided we can cover the whole scene with three shots all in the same take with some simple camera movement, the lens selection and exact camera placement is important to ensure the frame size of each shot is as required. This will probably require a little trial and error to get it correct but once it is you are good to go from a camera perspective!

Now it is worth noting that when you are covering a scene or even a large part of a scene with just one take, the timing of the actors is really important as this can determine the pace of the film. A good director will know what pace they want from the actors and will 'direct' accordingly. The less experienced directors and actors will normally have it play out a lot slower than it should for film, therefore it is worth running it through and playing a take back if you feel as the Cinematographer that the pacing isn't correct, as this will be very difficult to correct in the edit!

Anyway, I think that is enough for one post… join me for the next post where I will cover the basic lighting aspects of story telling.

If you want to see how I make use of lens selection, camera movement and shot choice, check out my work and showreels at www.djmears.co.uk

Monday, 20 February 2012

Interview Lighting: Quick, Easy and Good Looking?


It was early last week I had a phone call from a director friend of mine Nathan Cook asking whether I would be willing to help out with filming some interviews for the University of Leeds RAG event ‘Take Me Out’ raising money for charity, my answer was yeh, of cause!

Now if you aren’t familiar with the format of ‘Take Me Out’ it is a bit like a cross between ‘Blind Date’ without the blind and ‘Britain’s Got Talent’ with out the talent, you can find more out about the format at the wikipedia page http://en.wikipedia.org/wiki/Take_Me_Out_(game_show)

Ok, so you get the idea, basically I need to shoot the video element of the show, filming the single men and the friends/family. Simple enough... well there is a catch… we need to setup and shoot 22 people in two, one hour slots… this is further complicated as the director is keen to shoot on DSLR! Just on the brink of pulling out my hair I looked at the shoot logically and though about what approach I would take to light 22 different people, with different skin tones, different shaped faces and different heights, all trying to make them look at their best. Well it is a dating game after all!

Thinking the rule KISS was applicable in this situation I then remembered a blog post I had read by Art Adams a little while ago titled ‘the simplest, fastest interview lighting setup—ever’. Now, I have been reading Art’s blog for some time now and find his approach to lighting fascinating and his results really amazing, Art ends his blog post ‘being fast is as important as making pretty images. This technique allows for both. Give it a try and see what you think.’ so I did! 


The basic lighting setup using one light and two pieces of polyboard

As you will read in Art’s post, the technique requires two 4’x4’ polyboard sheets, a 650w fresnel and relevant stands and a few pieces copy paper, simple! As this was a no budget shoot I had to pull it off with my own kit and that begged and borrowed too! So with my fantastic assistant Ollie Craig lined up to help out I knew we could pull it off!

So How Did We Pull It Off?

One of the contestants doing his bit in front of the camera

We turn up to location not a minute before 4pm to setup, we really had to keep the setup time to a minimum as we had some many people to shoot. For lighting we setup as per Art’s suggestion but having to use ‘reflector holders’ to hold the polyboard in place as I don’t have any polyboard forks. 

The technique of using the 'reflector holders' to hold the polyboard actually works much better than it sounds. It requires that the two parallel edges of the polyboard are pushed against the reflector holder hooks, and the arm tighten up to hold it in place. Once mounted on a large lighting stand the boards and be rotated in all directions. 

Our interview setup

As the room we were shooting in was small, the background was pretty close to the subject. We decided to replace the plain white wall with a black sheet and insert a ‘Take Me Out’ poster made by the RAG staff to make it a bit more interesting. With the background being quite close to the subject this not only makes it difficult to separate the background from the subject but it also makes flagging light from the background pretty difficult too, particularly when it needs to make the black sheet dark and consistent enough in terms of brightness but also needs to illuminate the ‘Take Me Out’ poster.  In the end we flagged the background with a black reflector placed between the white polyboard and the background, slightly tilted to give the greatest effect on the background. We also mounted the ‘Take Me Out’ poster on a spare stand I had so we could move the poster up/down and left/right depending on the height of the person. This worked really well as it just took two ticks to get the poster in the perfect position for the person. 

I had my newly purchased LG ISP225 21.5” monitor on set. This is a newly launched budget IPS LED monitor which is calibrated at the factory. It offers greater off axis viewing than PN panels and more accurate colour reproduction too. At full 1080p resolution with HDMI in, and a street price of £130, I think it is a bargain! This was the first outing for the monitor but it made shooting on the DSLR much easier for showing the director/producer the shot and for getting a better idea of lighting. It came in particularly useful when moving the ‘Take Me Out’ poster for each person as it avoided the usual left a bit, right a bit routine with the person moving the poster and the camera op!

The room was so small there was only just enough space to sit behind the lens!

In terms of our camera setup, we used my trusty Canon DSLR with a Canon 50mm f1.4 lens donated by Ollie, setup with follow focus and matte box. When prepping for this project I was very keen to get the look in camera as there was very little time in post for the project. Because of this I decided not to shoot on my usual Technicolor ‘Cinestyle’ setup but instead on the ‘Standard’ profile the Canon offers to give the picture more contrast and saturation to avoid the need for any post-production colour grading. In addition, I was keen to give it that typical dating show interview look, softening the picture slightly, giving it that dreamy look. I opted to use my supermist black ½ formatt 4”x4” filter to achieve this, and I think it worked pretty well. I also wanted to get the background slightly defocused so not to make it distracting. Now with the background close to the subject the DSLR came into its own with its shallow depth of field. I think in the end I shot at about f2.5 at ISO200 giving me just enough room for the background to go out of focus but to also give the subject a little room to move, although if they moved too much it was game over in terms of focus! In the picure above you can see how small the room was with the camera practically shoved against the back wall!

The fill side polyboard with two sheets of A3 paper attached to add positive fill

At 4:30 the first interviewee sat down and we started to roll. The only thing I found with the lighting setup was that the key didn’t wrap around the face quite enough for my liking even with positive fill on the fill side polyboard. To correct this I had to angle the key polyboard slightly more towards the interviewee than Art demonstrates in his article.  I found this solved the fill side brightness problem and gave a nicer wrap around in my option, although in hindsight this could have been caused by the interviewee not sitting off axis enough from the camera. I also placed the light and polyboard slightly higher than Art suggests in his article to get the nose shadow to fall down the smile line, now with this setup the shadows are so soft it is barely noticeable but I think it was worth it. 

The white polyboard angled for the light to wrap around the face more 

Overall I found the lighting setup offered a lovely soft source which, in comparison to other standard setups, made everybody who was interviewed look really good with minimal readjustment. It gave each interviewee a great eye light and a lovely gradient from the light to dark side of their face. The setup is pretty compact when compared to similar size softbox sources, and I think it is quicker to setup when you factor in the readjustment time which would be required when using one.


With this setup we managed to blast through all the interviews in two hours, even having to tailor the setup slightly to get two people in shot a few times. This actually works well as the source is so big enough that nobody blocks the other persons light. 
  
There is something liberating about lighting interviews with no budget and minimal kit and making them look great. And I feel this setup offers exactly what Art says at the end of his post ‘being fast is as important as making pretty images. This technique allows for both’. I couldn’t agree more!

Thanks again to Ollie for providing some of his equipment for the shoot; along with his time and the BTS photos he took. And of cause I wish Leeds RAG all the best with their event!

If you want the check out more of my work and reels, visit www.djmears.co.uk

Saturday, 18 February 2012

Welcome to my Blog!

Hello, and welcome to my blog!

Having spent the last few years reading many great blogs about camera and lighting techniques I thought it was a good idea to start sharing some of my techniques and approaches I apply in my work as a cameraman.

I will try and make these posts as interesting and informative as possible and include reference videos, photos and lighting plots where possible.

Thanks for reading and watch this space for my first proper post!